MEMCloud Architecture
Goals
- Make it a platform based solution, allowing 3rd party developers to plug-and-play different services.
- Provide end-to-end capabilities so that users don’t have to develop missing pieces
- Design suitable for energy systems (microgrids, smartgrids, building automation, IoT etc)
Architecture Overview
MEMCloud is a component of SEUP. Before you read about MEMCloud, check out the following resources to know more about SEUP and how MEMCloud fits into the SEUP puzzle
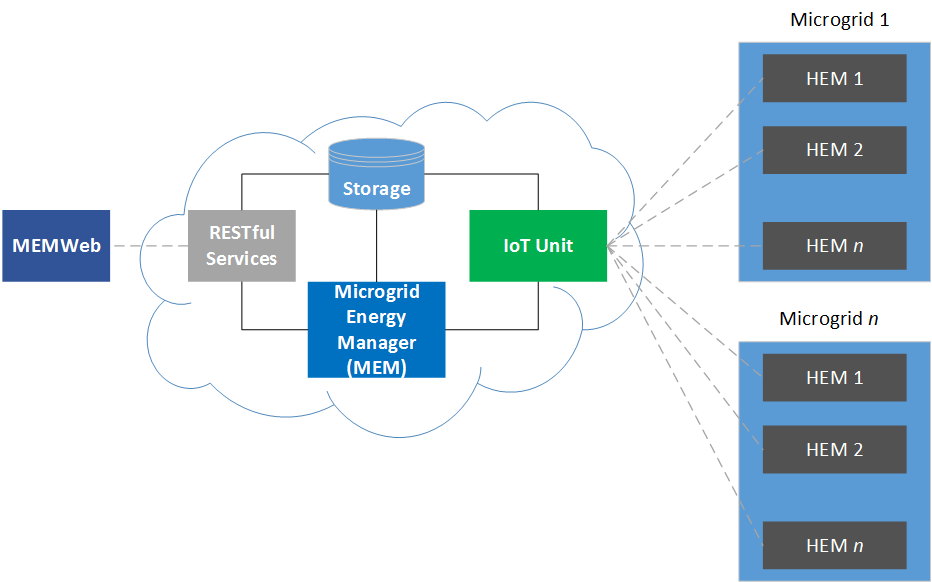
MEMCloud consists of five main components that include storage, RESTful Services, IoT Unit, Microgrid Energy Manager (MEM) and MEMWeb.
- RESTful service - serves the MEMWeb. It exposes a suite of REST APIs that MEMWeb can use to integrate with the backend services.
- IoT Unit - The IoT unit on MEMCloud acts as an interface between HEMCore and other components of MEMCloud
- MEM (Microgrid Energy Manager) - The MEM is the core of the backend infrastructure. It houses applications which are responsible for operation, management, control, and optimization of all the MGOs. These applications are developed by users and are deployed through MEMWeb
Setting up MEMCloud (MEMBackend, IoT Engine and DBs) on a local machine/server for testing and development
MEMCloud consists of two main components as far as code is concerned MEM WebApp and the code which corresponds to the IoT Engine and MEMBackend
Stack and Infrastructure details
Node.jsfor both front-end(withExpress) and back-endAngular2along with a host of other libraries for our Web applicationsMySQLfor Web application related stuff.MongoDBfor IoT related stuff.RabbitMQfor our messaging serviceDockerfor containers
Setting up on your local machine
Fork a branch from production. This is the latest branch
Once you clone the repository,
memis the main directory. Under mem, the distribution is as followsappandpubliccorresponds to the Web application/User Interface. The main file which is use to start the Web server isapp.js. Note: The web app has environment dependencies at this point runs only on an AWS environment (it uses googleOAuth, AWS load balancer etc.). Work has to be done to configure to run on a local system.- Running the back-end which consists of all the IoT engine, MEMBackend and databases is relatively easier on local system
cloudis the main directory which has all files.clientsdirectory has the software clients (which emulate the hardware)package.jsonis ourNode.jsdependencies.
PART 1 - Installation and setting up of MEMBackend and IoT Engine
- Setup a separate VM (maybe Ubuntu) in case things screw up. We run
Ubuntu server 14.04on AWS. - Install
node.jsversionv6.9.xfromhttps://nodejs.org/en/. We use versionv6.9.2 - Install
MYSQLYou can use this guide (or any). We use version5.5.44-0ubuntu0.14.0.4.1- https://www.digitalocean.com/community/tutorials/how-to-install-mysql-on-ubuntu-14-04 - Install
MongoDBusing this guide (or any) - https://www.digitalocean.com/community/tutorials/how-to-install-mongodb-on-ubuntu-14-04. We use version 3.4.1 - Install the latest version of
RabbitMQusing sudo dpkg -i rabbitmq-server_<version number>_all.deb. You can use this https://www.rabbitmq.com/install-debian.html. We use version 3.6.5 - Configure RabbitMQ replace
/etc/rabbitmq/rabbitmq.configwithmem/cloud/rabbitmq.config - To clear all exchanges and start the queues - use this
sudo rabbitmqctl stop_app && ``sudo rabbitmqctl reset && sudo rabbitmqctl start_app - In mem/ directory, run
sudo npm install. This installs all thepackage.jsondependencies. Before starting the backend server, the log path has to be updated as per your local system inmem/cloud/config.js - Change line 4 :
var logPath = "./log/";to whichever directory you want to collect logs in. - Import the MySQL and MongoDB schema (copy of both these databases will be provided). The mongoDB backup is mongo_backup_feb_3_2017. To use this as your database, you can run
mongorestore mongo_backup_feb_3_201``7. The mysql file is ``mysql_backup_feb_3_2017in the mysql directory.
- Setup a separate VM (maybe Ubuntu) in case things screw up. We run
PART2 - Creating and adding keys
Create a new directory keys in mem/cloud/
We need to create a self-signed certificate for TLS.
- In
mem/cloud/keys, executeopenssl req -x509 -newkey rsa:4096 -nodes -keyout private-key.pem -out public-cert.pem -days 365 - This will ask for a bunch of information. You can enter anything arbitrary (for testing and local development).
- It then generates two files
public-cert.pemandprivate-key.pem. - Copy
public-cert.pemtomem/clients/python
- In
PART3 - Running server and client
- Uncomment
line 41(console.log) incloud.jsinmem/cloud. This will show the data the cloud is receiving. - To run the server, execute
sudo node run.jsin themem/clouddirectory - The console show the data received by the cloud (Hold on! You have to start the clients. See next step).
- Before you start the clients, comment line 21
(T="memcloud.io",23123)and uncomment line 20 (T="localhost",23123). This ensures your clients connects to the local server that is running on your machine. - Now start the clients. The clients (which emulate actual hardware) can be found in
mem/clients/python. - To start the clients run
python clients_tls.py 4inmem/clients/python. This starts 4 clients. - The console shows the data the client is sending.
- Uncomment
Issues you might face
- Installing Mongodb 3.4 on 32 bit ubuntu : Refer below link https://docs.mongodb.com/manual/tutorial/install-mongodb-on-linux/
- While running server, you might get an error
Cannot find module bunyan & amqplib/callback_api. To resolve this :Inmem/runsudo npm install bunyan;sudo npm install amqplib - Change logpath from
./logto appropriate path inclient_tls.pyfile - In
databaseService.js:Change the username and password to match the one you used to when creating mysql